Publish your own Nuget packages to Github Nuget Registry with Github actions.
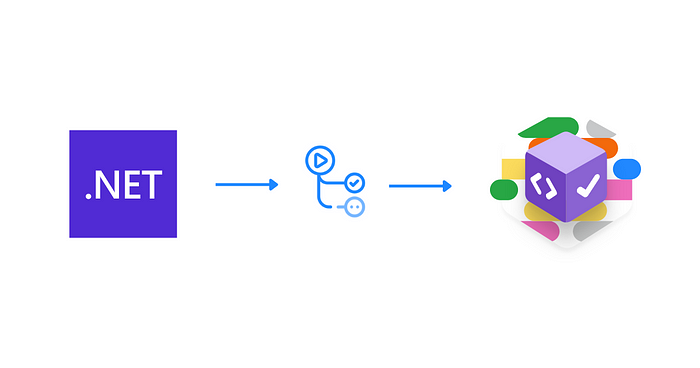
NuGet is a popular package manager for .NET developers that simplifies sharing and reusing code. With NuGet, developers can easily create, distribute, and consume packages containing code, dependencies, and other assets.
In this article, I’ll explore how to create a .NET NuGet package and host it on GitHub’s NuGet Package Registry using GitHub Actions. Specifically, we’ll be creating a NuGet package that includes a simple calculator, which you can use to perform basic arithmetic operations in your .NET projects.
We’ll first need to create an empty class library project in Visual Studio to get started. This project will serve as the basis for our NuGet package, and we’ll add the necessary code and files to it as we go along.
To create a new class library project in Visual Studio, follow these steps:
- Open Visual Studio and select “Create a new project”.
- Select “Class Library” as the project type and choose a name and location for your project.
- Click “Create” to create the new project.
Once you have your empty class library project set up, we can move on to adding the necessary code for our calculator and packaging it as a NuGet package.
By default, when you create a new class library project in Visual Studio, it includes a Class1.cs file. However, for our purposes, we don’t need this file, so we’ll delete it.

Next, we’ll create a new folder within our class library project called “contracts”. This folder will house the interface for our calculator, which we’ll make shortly.
To create the “contracts” folder, right-click on the project name in the Solution Explorer and select “Add” > “New Folder”. Name the folder “contracts” and click “Create”.
Creating the calculator interface
Once the “contracts” folder has been created, we’ll add the interface for our calculator to this folder. This interface will define the basic functionality that our calculator will provide.
We’ll name our calculator interface “ICalculator”. This interface will define the basic functionality that our calculator will provide, including methods for addition, multiplication, division, and subtraction.
To create the “ICalculator” interface, right-click on the “contracts” folder in the Solution Explorer and select “Add” > “New Item”. In the “Add New Item” dialog box, select “Interface” and name the interface “ICalculator.cs”. Click “Add” to create the new interface.
In the “ICalculator.cs” file, we’ll define the methods for our calculator interface. We’ll include methods for adding two numbers, multiplying two numbers, dividing one number by another, and subtracting one number from another. Below is my calculator interface.
namespace calculator_nuget_demo.Contracts
{
    public interface ICalculator
    {
        public int Add(int a, int b);
        public int Subtract(int a, int b);
        public int Multiply(int a, int b);
        public int Divide(int a, int b);
    }
}
Next, we’ll create a class called “Calculator” that will implement the “ICalculator” interface we just created. This class will contain the code that performs the calculations defined by the interface methods.
Implementing the calculator
Below is the code of my calculator implementation.
using calculator_nuget_demo.Contracts;

namespace calculator_nuget_demo
{
    public class Calculator: ICalculator
    {
        public int Add(int a, int b)
        {
            return a + b;
        }

        public int Divide(int a, int b)
        {
            return a / b;
        }

        public int Multiply(int a, int b)
        {
            return a * b;
        }

        public int Subtract(int a, int b)
        {
            return a - b;
        }
    }
}
Packaging the project
After implementing the “Calculator” class, the next step is to package the project and generate a DLL file for other .NET projects. To do this, you can right-click on your project in the Solution Explorer and select “Properties”. In the project properties window, click the “Package” tab and check the “Generate NuGet package on build” checkbox.
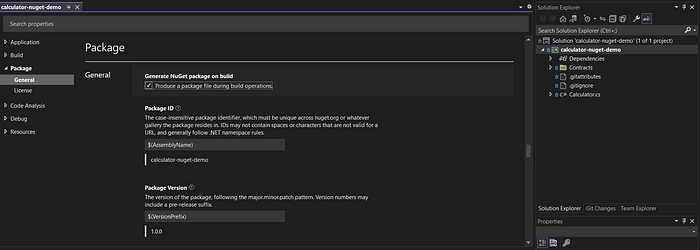
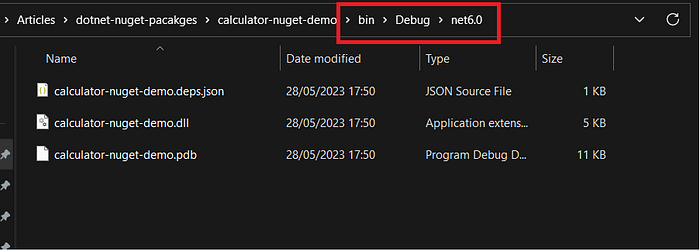
Choose a version number for your package and fill in the other relevant information, such as the package name, description, and author. Save your changes and rebuild the project. Then if you go to the bin > debug > net6.0 folder you can see the generated package has been included inside there. That’s to verify whether the package is created without any issues.
Now we need to build the package inside GitHub and push it to the package registry using a Github action. For that create a new repository on GitHub and commit and push your local project to that GitHub repository.
Then go to your .csproj file and add your repository URL inside the property group tag. This will add source control metadata to your NuGet package.
  <PropertyGroup>
    <RepositoryUrl>https://github.com/PasinduPrabhashitha/.NET-Nuget-Package-Article-Demo</RepositoryUrl>
  </PropertyGroup>
After that, since actions are running inside a virtual machine we should authenticate that action with our Github account in order to publish this package to the Github package registry. For that, we can create a new personal access token.
To create a personal access token in GitHub, you can follow these steps:
- Log in to your GitHub account and click on your profile picture in the top-right corner of the screen.
- Click on “Settings” from the dropdown menu.
- From the sidebar on the left, click on “Developer settings” and then click on “Personal access tokens.”.
- Then go to the Tokens(classic) tab.

5. Click on the “Generate new token” button.
6. Give your token a descriptive name and select both below permissions.

7. Click on the “Generate token” button at the bottom of the page.
8. Copy the generated token and store it in a safe place, as you will not be able to see it again.
Then we should add that generated token value to our repository as a secret so when we reference it inside the GitHub Action workflow it will grab that value from the repository secret. To do that go to the settings of the repository. Then go to the secrets and variables and then go to the actions. On there, you can see the new repository secret button and click on it. For the secret name give the name “NUGET_PACKAGE_TOKEN” and paste the generated secret as the secret.


Now we have successfully added the Personal access token to the repository. Now we can add the workflow. To do that go to the actions tab on the repository.

Now click on the Actions tab.

Then click on the set up a workflow your self-link and you will be then redirected to the workflow editor window.
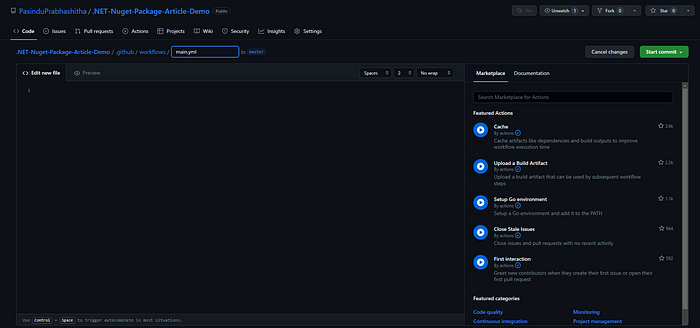
Now paste the following code to that editor and substitute yourusername with your GitHub username.
name: Action to build and publish the project as a nuget package to github package registry

on:
  push:
    branches: [master]

jobs:
  build:
    runs-on: ubuntu-latest
    outputs:
      Version: ${{ steps.gitversion.outputs.SemVer }}
      CommitsSinceVersionSource: ${{ steps.gitversion.outputs.CommitsSinceVersionSource }}

    steps:
    - uses: actions/checkout@v2
      with:
        fetch-depth: 0 #fetch-depth is needed for GitVersion

    #Install and calculate the new version with GitVersion
    - name: Install GitVersion
      uses: gittools/actions/gitversion/setup@v0.9.7
      with:
        versionSpec: 5.x
    - name: Determine Version
      uses: gittools/actions/gitversion/execute@v0.9.7
      id: gitversion # step id used as reference for output values
    - name: Display GitVersion outputs
      run: |
        echo "Version: ${{ steps.gitversion.outputs.SemVer }}"
        echo "CommitsSinceVersionSource: ${{ steps.gitversion.outputs.CommitsSinceVersionSource }}"

    #Build/pack the project
    - name: Setup .NET
      uses: actions/setup-dotnet@v1
      with:
        dotnet-version: 6.0.x
    - name: Build and Pack NuGet package
      run: dotnet pack src/services/Florage.Shared/Florage.Shared.csproj -p:Version='${{ steps.gitversion.outputs.SemVer }}' -c Release
    - name: Upload NuGet package to GitHub
      uses: actions/upload-artifact@v2
      with:
        name: nugetPackage
        path: bin/Release/

  release:
    runs-on: ubuntu-latest
    needs: build
    if: github.ref == 'refs/heads/master' # only run job if on the master branch

    steps:
    #Push NuGet package to GitHub packages
    - name: Download nuget package artifact
      uses: actions/download-artifact@v1.0.0
      with:
        name: nugetPackage
    - name: Prep packages
      run: dotnet nuget add source --username yourusername --password ${{ secrets.NUGET_PACKAGE_TOKEN }} --store-password-in-clear-text --name github "https://nuget.pkg.github.com/yourusername/index.json"
    - name: Push package to GitHub packages
      if: needs.build.outputs.CommitsSinceVersionSource > 0 #Only release if there has been a commit/version change
      run: dotnet nuget push nugetPackage/*.nupkg --api-key ${{ secrets.NUGET_PACKAGE_TOKEN }}  --source "github"

    #Create release
    - name: Create Release
      if: 1 == 0 #needs.build.outputs.CommitsSinceVersionSource > 0 #Only release if there has been a commit/version change
      uses: actions/create-release@v1
      env:
        GITHUB_TOKEN: ${{ secrets.NUGET_PACKAGE_TOKEN }}
      with:
        tag_name: ${{ needs.build.outputs.Version }}
        release_name: Release ${{ needs.build.outputs.Version }}
    - name: Create Release
      if: needs.build.outputs.CommitsSinceVersionSource > 0 #Only release if there has been a commit/version change
      uses: ncipollo/release-action@v1
      with:
        tag: ${{ needs.build.outputs.Version }}
        name: Release ${{ needs.build.outputs.Version }}
        artifacts: "nugetPackage/*"
        token: ${{ secrets.NUGET_PACKAGE_TOKEN }}
I’ll go through the above action and explain what it does. First, the workflow will run when there is a push event to the master branch.
This code defines two jobs, “build” and “release”, that run on an Ubuntu environment. These jobs are executed when the code is pushed to the “master” branch.
The “build” job is responsible for building the project and creating a NuGet package. It does this in several steps:
- It checks out the code using the “actions/checkout@v2” action.
- It uses GitVersion to determine the version number of the project. GitVersion analyzes the code history and generates a version number based on the commit history. The version number is outputted as a variable for use in later steps.
- Then it builds and packs the project using the determined version number. This is done using the “dotnet pack” command. The built package is then uploaded to GitHub as an artifact using the “actions/upload-artifact@v2” action.
The “release” job is responsible for publishing the created NuGet package to GitHub packages and creating a new release. It does this in several steps:
- It downloads the NuGet package artifact created in the “build” job using the “actions/download-artifact@v1.0.0” action.
- It pushes the package to GitHub packages using the “dotnet nuget push” command. This step only runs if there has been a commit/version change, as determined by the “if” statement.
- It creates a release on GitHub using the “ncipollo/release-action@v1” action. This step only runs if there has been a commit/version change, as determined by the “if” statement. The release includes the version number of the package and consists of the package as an asset.
And now you can save the changes to the repository by clicking on the start commit button. Then you will be redirected to the code tab and if you again switch to the action tab you will see our workflow is running and then it will display like below.

Wait until it finishes the workflow run and after that, if you go to the code tab you will see the published package there.

. Now whenever you change the code, this workflow will automatically run and publish a new version of this package.
Bonus: Installing this package inside your other project.
So up to now, I showed you how to host the package. But now the problem is how we can consume this package in another project. Actually, that’s pretty easy. The thing you need to do is create another personal access token with read-only permissions for packages.
Once you do it, inside your computer you should open the terminal and execute the following script.
dotnet nuget add source "https://nuget.pkg.github.com/githubusername/index.json" --name "githubfeed" --username "GithubUserName" --password generatedaccesstoken --store-password-in-clear-textAdd your own GitHub username and PAT token to the above command and execute the code.
This command will add another dotnet package source for our GitHub package registry. After you do it when you go to the Nuget package installer you will see the new package source and it will display your Nuget packages including this package inside the GitHub registry.

That’s it for this article. If you need the source code of this article you can find it through the below Github repository.
https://github.com/PasinduPrabhashitha/.NET-Nuget-Package-Article-Demo
Be sure to check out Microsoft’s documentation to get some more info regarding the Nuget package creation through the following link.
https://learn.microsoft.com/en-us/nuget/create-packages/overview-and-workflow


